Hi. I am following a tutorial trying to filter out the data coming from Airtable to show only items that match the current user (which I get through Firebase and is stored in a variable called “User_ID”. Can anyone here see what is wrong with this block? Id doesn’t work for me.
From the blocks it seems to me that you want to create a list of items for that specific user.
If this is correct then you don’t need to do two loops and you can do it in just one loop
However, you need to be sure that there are rows in your table and the “User ID” is actually matching before you add to the list the “Items” of the matched row.
This was added for me when I first created a DataViewerList with Airtable, so I didn’t thought of put it here as well.
Do you guys know if it is possible to do this User ID filtering with Data Viewer List as well? How can I do that?
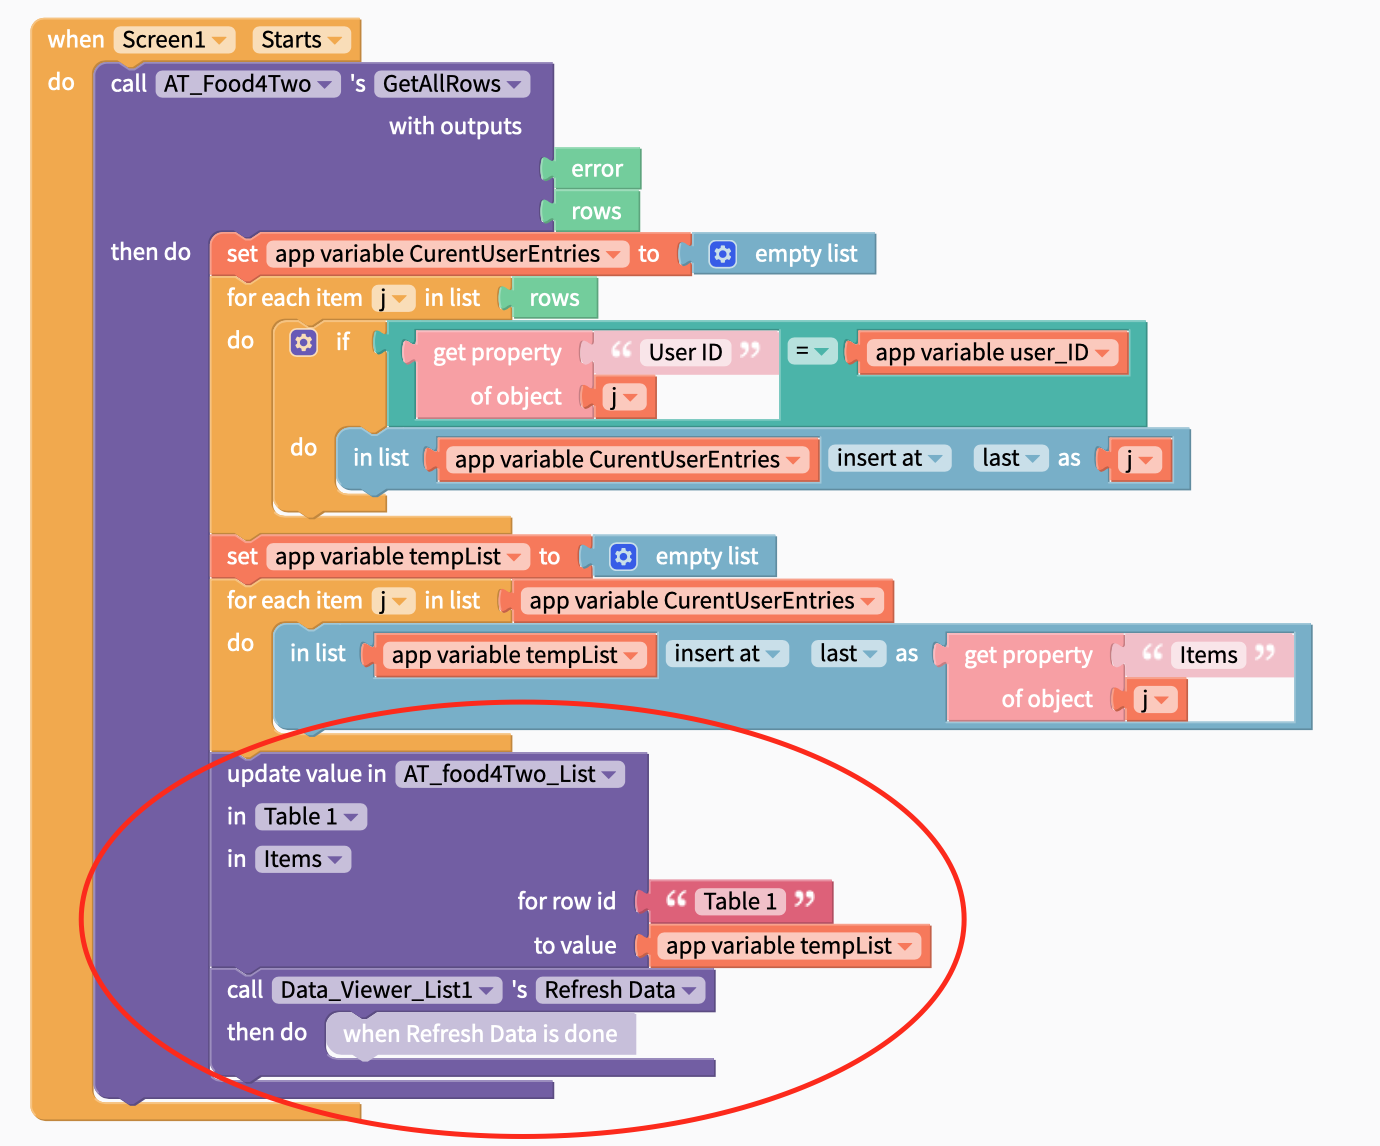
Can I just replace that last line some how to something for DataViewerList component? Like this? But if so I am not sure what to put in the “row id” block(?) It shouldn’t be for any specific row? I mean, I want this filtering for ALL my rows…
Thanks muneer. That makes sense. So to add something to the DVL I need to add it to the data source? So, in this case maybe the “update value in”-block would be a good go?
I want to do something similar to this but in the DVL:
How can I specify “for ALL rows”? Is there any way to do that? Like in Google Sheets, you can type ex A1:A, that would give you ALL the column "A"s rows starting from “1”.
Is there any similar to do in Thunkable?
Now I tried to just type the Table’s name (just to try, but that didn’t work obviously).
What I want to happen is that we will compare the current logged in user with the user ID in the “User ID”-column in the Airtable sheet. And then we will create a list with only those items ONLY, and put them in the tempList variable. Then I want that tempList to be the source data for my DVL.
Hope this makes any sense? Maybe there is a much eisier way to do this?
deeper thought…
“update value in”-block does not feel right…
I don’t want to change any data in the database, I only want to view the filtered data in my DLV.
Let’s start and use the connection to the table in Airtable with the Data Source method by clicking on the “+” as seen here
This should show a dialog like this
If you have already connected your table then selected from the list. Otherwise, click the Create New button
Choose Airtable
Supply the API key
Choose the Airtable base
This will give you an entry under Data Sources with your base so you can choose the table to work with.
I have created a table in my account similar to the table you showed “AT_Table” to work with it
In the screen, I added a list viewer to give a list of users and underneath it a DVL to show the “items” of the selected user.
I also used the Data Sources to create a Local Storage (Create your own table) table to connect with the DVL
This is how the table looks
The open screen just lists the available User IDs without duplicates
When the user select an entry, the process is to clear the local table and loop through the table in Airtable looking for matching “User ID” and take the “Items” field and add it to the local table
Hi
Thanks a lot for this demo! Even though it was not completely how I wanted to do I still got a lot of ideas and did some tweaks to get it fit in my project. Now I am really close!!
What I has been focused on since this demo is to actually “mirror” the list in my ListView (with the AirTableData) to my DVL (With my LocalData). Just like you do in the demo but I want the Items to be “mirrored” Since I already got the UserID filtering functions in the ListViewer.
So, now I have managed to get that “mirroring” on place BUT it all ends up un the same row in my DVL. Do you have any idea how I can “split” these to 1 item per row?
So, all the items in the list at the bottom are items that are belonging ONLY to this current logged in user.
And I can see all these items in the DVL at the top as well, but all in one and same row as you see.
This is simply what I did to get this work, inspired by your demo =)
You are creating a row and assigning “tempList” to the field in the “myitemList” table. This means you are adding the full List with all items in one single record.
You need to do “for each item J…” for the list “tempList” to add each element at a time.
Hi.
Thanks, yes I do add a list, and this is the reason why all the items ar at one row, I understand that. Great! Then it is a “for each item J…”-block I should use then! Thanks.
Well, at the moment I can not do anything cause my app is crashing (but only on desktop it looks like…)
I will try to log in and log out again to see if that helps…