I have created a working quiz app using a google sheets database. It is multiple choice using buttons instead of a list label. For some reason I could not find and example of this that worked with a DB instead of block entered questions. As you may have found out that can be very time consuming if you have more than a dozen questions and answers. Here is the link to my project and below are the blocks I used and a description of what the functions are.
I started out with a Splash Screen.. you can put whatever logo, image or text you want here.

Here are the blocks. When it opens it waits 3 seconds (Adjust to your liking) then continues on to the home screen.

On to the Home Screen. Very simple setup. Just type your welcome message or instructions and click the start button to begin quiz.

Home screen blocks. Not much here to do except point the start button to your Quiz.

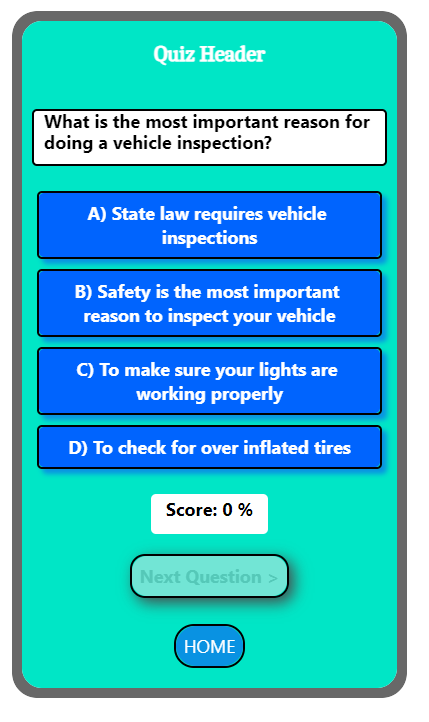
Quiz Screen.
Start out with the header to name your Quiz, for my quiz its a study quiz to get your CDL. So could be CDL Prep.. so whatever suits your quiz.
Then there is a label box that displays the questions. It self adjusts to the content its holding.
We have 4 question buttons. Followed by the current Score. Once they make a choice the Next Question button will become clickable and then display if you got the answer correct. Finally a home button to take you back to the home screen.
Depending on what answer they choose they will be greeted with a CORRECT or INCORRECT screen and message telling them what the correct answer was.
Here is the CORRECT answer screen. You can see the score updates below and the Next Question is now clickable.

And the INCORRECT screen.

Here are the blocks for this screen. I’ll break down a little of this for you.
(1) Initialize your variables.
- App Variable Ans_Ltr sets the correct answers to A,B,C,D to match the answer key in the DB (Shown Later)
- App Variable Index keeps track of how many questions you have answered and compares them to the length of the DB to determine when the quiz is over. We start at 1 so when we answer question 1 it increases it to 2. This keeps the index number 1 number more than the question number. It will make sense later. (If your DB grows you do not need to edit any blocks).
- App Variable QuestionList determines what question you are on and what the next one should be. We start it at zero when the screen loads so when we load the question box it increases it by 1. This sets the 1st question to question 1.
- App Variable Score keeps track of the score as you progress.
(2) When the quiz page opens we will:
- Disable the Next Question button
- Set the score to 0
- Start counting how many questions we have been asked
- Set the quiz to the first question in the DB
- Set the beginning score label to display the current score which is zero at the start, like “Score: 0 %”
- Start the Quiz functions
(3) I have it set to a percentage. You can remove this if you just want to display a number score without a % sign like “Score: 75”

In these blocks we will fill in the question box and answer buttons. They will get the results from the database on google sheets.
When the QuizUpdate function is active it will do the following:
- Set Question Box label to text of the 1st question in the the database.
- Set Answer Buttons 1-4 to the corresponding answers in the database.
(1) We set the Answer buttons to visible or “True” here so you can choose the one that answers the question. (These will hide after clicked, I’ll show you that in a later block)

In these blocks we will handle what happens when the user clicks a button.
(1) When the user clicks on an answer button:
- Set the answer to A, B, C or D so it can compare it to the DB Right Answer column. Example.. If they click Answer Button 1 it will look in the DB to see if the answer key for that question is A. This will be handled in the next set of block later.
- AfterClickAnswer function will be activated. This also will be in the next blocks.
(2) When the user answers the question they must then click the Next Button. It operates as follows.
- “Change” the index number by 1. To keep track of how many questions we have answered.
- “IF” the Index number is Greater than the number of ROWS in the DB the then we have ended the quiz. Example lest say we have 20 questions. When we have answered 20 questions the index will say 21 (Remember earlier we started the app with index set to 1 and question set to 0) but we only have 20 questions. Since the index says we have one more than the length of the DB the quiz is over.
- If we ARE at the end we “DO” navigate to the Final Score Screen to show the results.
- “ELSE” If we have not reached the end we activate the Next Button function.
(3) Next Button function:
- When the Next Button is clicked AND the quiz is still going we use this function. This causes a new set of questions and answers to display.
- Disable the Next Button so the user can not click it until they click on an answer.
- Set the question box FONT back to 18. (This will make sense in the next set of blocks)
- Set the question box Background color back to white (Also in the next blocks)
- Set the question box Text to “nothing” (Yep you guessed it.. next blocks)
- Change the question number by 1.
- Update the quiz screen to the next question and set of answers.

Here we tell the app what to do when a user clicks on an answer.
(1) Since the AfterClickAnswer function was called we need to tell the app what to do after an answer is clicked.
- Re-enable the Next Question button so they can move on to the next question.
- Hide all the Answer buttons after each question is answered so there is room for the message box to display the correct answer and so the user doesn’t keep clicking on the buttons to raise the score.
(2) This section has to do with the score tracking and display of correct or incorrect answer.
- “IF” Check to see if the answer was correct using Ans_Ltr A,B,C,D to verify it “EQUALS” the same letter A,B,C or D in the Right Answer column.
- “DO” If right answer, Set the score to whatever the current score is + 4. So if its 8, then it will set it to 12. (I have it set to increase by 4 because I am using a % score for my quiz. I have 25 questions so it will increase by 4 so if they answer all correct they score 100% [100 / 25 = 4]. If they miss one they get 96%, two 92% and so on till they fail. Then I set the PASS / FAIL on the Final Score Screen coming up in the next blocks.)
- Set the question box text to display CORRECT and show the correct answer message from the database Message column.
- Set the question box background to GREEN
- Set the FONT to 25
- “ELSE” If its INCORRECT leave the score as it is
- Set the question box text to display INCORRECT and show the correct answer message from the database.
- Set the question box background to RED
- Set the FONT to 25
- Vibrate the phone for incorrect answers
(3) Display the current score in the score label. You can remove the % sign here if needed.

Final Score Screen
Once the Quiz Screen determines you are done with the quiz it send you to this screen.
If you Pass it will look like this.

If you FAIL you will see this screen. The screens are the same, the blocks just control the label block according to the score.

Here are the blocks to make it work.
When final score screen opens it will “DO” the following
(1) “IF” the score is “Equal or Greater than” 80 it will do the first. (I have this set to 80 so it will be a passing score out of 100. You can change this to whatever number you want to be a passing score for your quiz. Just remember if your not using % you have to remove all of them in the blocks.
- So “IF” the score is equal to or greater then the number you set, it will set the score label text to “Final Score: #% PASSED! Good Job”
- Set the final label background to GREEN.
(3) Make the background flash on PASSED. (You can remove all the blocks in the YELLOW (3) brackets if you just want it to stay solid GREEN and not flash.
- Wait 1.5 seconds and repeat but this time change the background back to WHITE.
- Back to GREEN
- Back to WHITE and so on, so the score appears to flash.
(4) This section is for FAILED
- “ELSE” If the score is “Less Than” what you set at the top then
- Set score label text to “Final Score: #% FAILED! Try Again” ( The \n tells the label to enter the next text on the next line.)
- Set the final label background to RED.
Then when the Home button is clicked it will return you to the Home Screen.

Database
I am using Google Sheets for my database.. there are others. You will have to research.
Here you can see how I have MY rows and columns setup. You can label the columns however you like and use as many rows as you want. However when it comes to the column labels (ie. Questions, Answer 1, Answer 2… ) You will have to point your blocks to the correct columns.
Notice in my Right Answer column I only have the letters A,B,C,D, .. that way I don’t have to type complete right answers (or copy paste) for every question. With my setup you will probably have to have 4 answers for each question. If you have less you can simply make the last 1 or 2 something like “C) All of the above” , “D) None of the above” or something similar. If you want 5 or more answers you will need to add another “When Answer Button Click” block and set it to Set App variable Ans_Ltr to “E” and “F” and so on, followed by AfterClick. Then add Answer 5-6 columns in the data base. The sky is the limit.

Thank you for all the help that I received here to create this Quiz. Please like this post and comment below with any questions or comments. I am new myself but I still may be able to help.