I found out a way to correct my app. But this is NOT recommended for those who are not willing to get stuck in with this etc. or understand what they are doing - but it’s not that difficult. Still, I can’t be held responsible if you do this and for some reason Google blocks this kind of upload in the future, or it causes any other problems for you, business, or your users etc.
Okay, disclaimer over!
Right, because I don’t believe in accepting the status-quo (at least for technology)…
I downloaded:
- Java Development Kit (latest)
- Android Studio (latest)
- APK Editor Studio
(I first just got the APK Editor but the Keystore feature wasn’t working and I was getting an error so I got JDK and Android Studio to ensure everything works correctly!)
I then downloaded my Thunk APK making sure to add relevant version Numbers. I also Exported my Keystore and password (at the bottom of Thunk App Settings).

Obviously your key will have actual letters, mine is hidden as this will be a live app
Once you’ve installed all that and got your APK/ Keystore, open your APK with the editor and click the Shield icon (with a keyhole), which is the ‘Edit application permissions’ (or Ctrl+Shift+P)

Then use the permission browser to remove the 4 aforementioned permissions
- android.permission.CAMERA,
- android.permission.RECORD_AUDIO,
- android.permission.READ_PHONE_STATE,
- android.permission.READ_CONTACTS.

I also removed all the calendar ones, Bluetooth ones and the fingerprint one, and any others I felt shouldn’t be there, but that’s up to you and obviously depends on your app (so don’t remove anything you think you’ll need!). If unsure, don’t do this AT ALL…
Next you need to add your Keystore and password.
Click the key icon

by the way if you don’t have these icons click settings (three cogs on the left of the key), or click Settings > Options and you need to go to ‘Toolbar’, and drag the items to the left, that you want on the toolbar:

Now to add your existing keystore (click the Key icon or hit Ctrl+K)

Now point the Keystore path to your downloaded Keystore from Thunk, and pop the password you get from the download put in both blue boxes I’ve highlighted. The Alias can be whatever you like.
Once you’re done here’s a step you ALMOST CERTAINLY SHOULDN’T DO. But I did because the size of the APK was 40mb for a app that had basically nothing except a few pngs and json files. Which is insane, and something I’ve been meaning to nag Thunkable about because Google cares about this (and i got my APK down to 25Mb!).
It even mentions this here: https://developer.android.com/platform/technology/app-bundle

Anyway, the next stage is removing some library files which are likley unneeded. This depends on the version of Android you are catering too and if you are creating internal apps for your business and have all your phones on a specific version of Android, you can likley go ahead with this.
Okay so in the Project Manager click the Open Contents button (Ctrl+E)

You’ll see an Explorer window open inside a directory in your temp folder, with some files that for your APK, one of them being lib, you’ll see it will be a large folder.

Open it and you’ll see a few more folders

I deleted
- armeabi (because it’s for very old versions of Android I won’t be supporting)
- x86 and
- x86_64 (which are both more for desktop versions or possibly tablets).
I removed them on an assumption and please don’t remove them if you think you may need them or don’t know what they do. More info here: https://developer.android.com/ndk/guides/abis
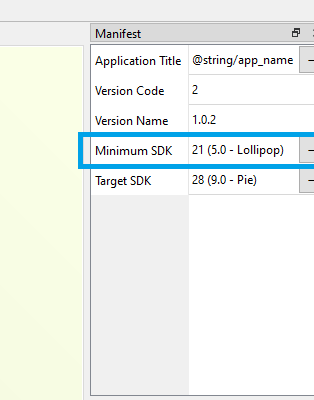
A note on changing what versions of Android can use your app. On the right side of the APK editor is the Manifest. You can change what version you use here. I made mine 23, which is 6.0 Marshmallow. Again, not recommended if you think your app will be used by people with older phones (they won’t be able to install it).
Now you’re done and it’s time to save!
Once done hit save on the Project Manager (Ctrl+Alt+S)

there is of course a menu option for this, and most other commands I’ve mentioned…
Then save your app to the Desktop or a folder if you have one and upload it. Mine got down to 24Mb from about 38Mb, but I hope to reduce that in the future.

The warning triangle you see it to tell you that your APK is still too big and it doesn’t use all the code. But it’s still okay to submit to the Play store.
I also removed a bunch of Thunkable images from the assets folder, but they weren’t very big files so I didn’t include instruction.
Hope this helps someone! 

- Did you use this instructional?
0 voters