Hello Thunkers! 
I am back with another Tutorial - & this time, it’s more Interesting… ![]()

 How to make Emotion Recognizer app in Thunkable X
Introduction
So, Basically, What is Emotion Recognition AI?
Emotional artificial intelligence, also called Emotion AI or affective computing, is being used to develop machines that are capable of reading, interpreting, responding to, and imitating human affect—the way we, as humans, experience and express emotions. What does this mean for consumers? It means that your devices, such as your smartphone or smart speakers, will be able to offer you interaction that feels more natural than ever before, all by simply reading the emotional cues in your voice.
How Does Emotion AI Work?
Emotionally intelligent AI relies on user-generated data to catalogue and compare reactions to certain stimuli, such as videos or phone conversations and uses machine learning to transform this data into recognition of human emotion and behavioural patterns. This, in turn, can be leveraged by call centres that can use this knowledge to understand both agents’ and customers’ needs to provide a better consumer experience. Emotion AI can provide a more in-depth look into the micro-emotional reactions users have during their experiences, providing valuable feedback for researchers.
Our API - Face++
In this tutorial, we are going to deal with the Face++ API.
With this API, we can have lots of power in our hands for our App. Such as - Facial Recognition, Body Recognition, & Image Recognition. But now, we’ll just focus on Emotion Recognition.
You can refer to the API Docs here.
Setup
-
So, our first process will be Registering at Face++.
-
Then, hover over to Face⁺⁺, and Sign in.
-
Next, go to Apps → API Key and copy your API Key and Secret to a sticky note.

Then, after you complete the whole setup, hover over to this API Reference.
Getting Started
Building the URL for Request
Our API Base URL is: https://api-us.faceplusplus.com/facepp/v3/detect
To build our final URL, we need to know our required Parameters.
We send Parameters generally by adding/embedding them in URL.
Let’s have a look at our Required Parameters -

(Sorry if the image is unclear, plz open in a new tab or maximize it  )
)
For every Parameter, we want to attach, we attach & before parameter name and = before parameter value. But, for the very 1st Parameter, make sure you attach “?”, not &.
So, our final URL formatted should be formatted like :

The Response
Like all common APIs, this site also provides us with a (our favourable) .JSON Response.
A look at the JSON
Take a look at the sample JSON Response here.
Or, download it : json response.txt (785 Bytes)
Our .JSON consists of 4 main items :
- image-id
- request_id
- times_used
- faces // only this is useful to us
Note : When you deal with JSONs, if you see " [ ] " brackets, then the item which has this brackets is a List. You need to call list items from the list. In our case, faces is a list.
Diving Deeper in the Response
Faces : 2 items - landmarks & attributes. // landmarks is not useful to us; only attributes.
Attributes : 3 properties - emotion, gender & age. // all are useful.
Emotion : 7 properties - // all represent values in % from your face.
- Happiness
- Sadness
- Disgust
- Anger
- Neutral
- Surprise
- Fear
Gender : 1 property - value
Age : 1 property - value
Cropping/Extracting useful things from the Response
Gender and Age
So, according to the above response, our path for getting Gender & Age would be :
value > gender > attributes > 1st item from faces.
value > age > attributes > 1st item from faces.

Emotions
So, according to the response, our path for getting Emotions would be :
- happiness > emotion > attributes > 1st item from faces.
- sadness > emotion > attributes > 1st item from faces.
- fear > emotion > attributes > 1st item from faces.
- surprise > emotion > attributes > 1st item from faces.
- anger > emotion > attributes > 1st item from faces.
- neutral > emotion > attributes > 1st item from faces.
- disgust > emotion > attributes > 1st item from faces.

Note: Make sure you match the emotion names correctly with the above pic and path given above the pic. These are CaSe SeNSitivE…
Completing the API URL
We need a URL for the image to POST it to API… Now?
The Cloudinary Media DB is the best and only solution for us.
Now, we need a face & it’s image URL for completion of blocks.
Getting Face & it’s URL
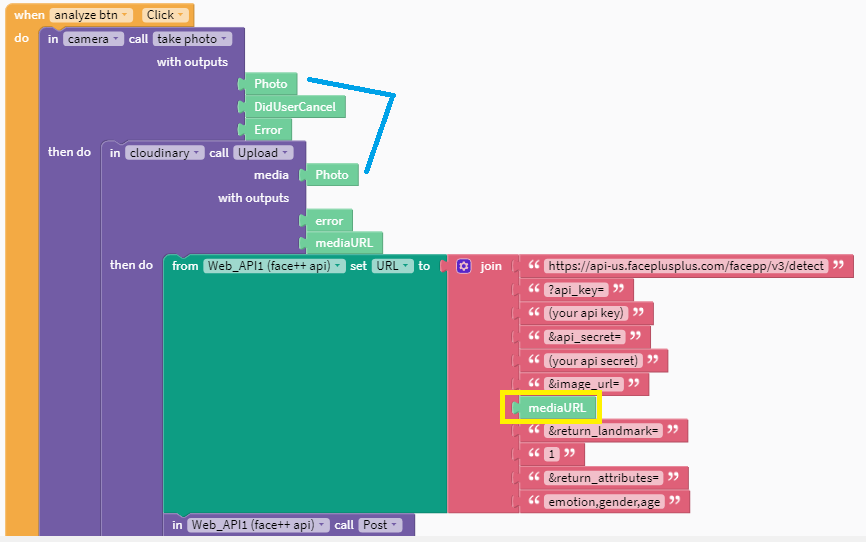
We’ll capture the face from the camera, and upload it to cloudinary.
Have a look at the blocks :
Final Touch
- You can add a loading icon & visible it before camera.take photo and invisible it after the whole process completes.
- Add an image component for the user to see his/her captured image (just for display.)
- Disable/Invisible the Analyze button just after the user clicks it. (This will prevent multiple clicks on the button.)
We’ve Successfully made an Emotion Recongnizer
Some Important Instructions :
Don’t forget to add your API key and Secret in the Code & valid Cloudinary Details in the Designer…
Image Requirements
-
The image size “should not be larger > 2MB”. - otherwise, the API will return errors.
-
Make sure the image is JPEG & PNG only.
-
Size should be between 48x48 and 4096x4096 (pixels).
-
Capture your Face with the Front Camera for making the image < 2MB.
Visit the Project Page here.
Remix the App here & post your Remixes in the Community! .
Credits :
Thanks to @actech & @jane for helping me with JSONs.
& Thanks @Behavioral Signals for the introduction to Emotion AI.


 but is still not working.


